Powered by Smartsupp FAQ frequently asked questions

FAQ frequently asked questions

A warm welcome to our FAQ section

Here you will find answers to frequently asked questions about shipping and ordering, as well as technical details about our premium aquarium LED strips and light controls.

General | LED bars | Choosing the Right Product | Getting Started | Installation | Water Cooling | Specifications | Power Supply | Light Control | Issues | SunRiser 8 | SunRiser 4 / 6

Of course, we offer attractive shopping cart discounts for your orders. Depending on the value of your purchase, you will receive the following discounts:

  • 3% discount for a purchase value of €333 or more
  • 5% discount for a purchase value of €555 or more

We want to ensure that you benefit optimally from your purchases with us. These tiered discounts are our way of saying thank you for your trust in our products. Go ahead, browse through our assortment, and enjoy exclusive benefits as you select your aquarium LED strips and light controls. If you have any further questions, we are at your service.

Service hotline

Mon-Fri, 8:30 am - 12 am and 1 pm - 4:30 pm

Support and counselling via:
+49 (0) 5257 / 93 666 50

WhatsApp
+49 (0) 171 807 84 81

Or via our contact form.

General

  • You can return the goods within 14 days of receipt.
  • To do so, please use the below withdrawal form and return the relevant items to us with sufficient postage.
  • You will receive a credit note or refund after the goods have arrived and been checked.
  • For the items you would like to buy instead, place a new regular order via our shop. It is not possible to offset the orders.

Return:

  • You can return the goods within 14 days of receipt.
  • To do so, please use the below withdrawal form and return the relevant items to us with sufficient postage. The return shipping costs are to be paid by the buyer.
    Send to: LEDaquaristik GmbH, Retour, Schierbusch 2, 33161 Hövelhof, Germany
  • Please also note that we will charge for any signs of use or transport damage. Therefore, please ensure that the items are well packaged.
  • A refund will be issued after the goods have arrived and been inspected via the originally selected payment method.

Exchange:

  • For the items you wish to purchase instead, place a new regular order through our store. It is not possible to offset the orders.

Excluded from withdrawal:

  • Items that are excluded from the right of return include, among others, aquarium covers and additional items that are made to customer-specific measurements and thus are made to order. (U-profiles, E-profiles, gravel trims), see Withdrawal policy

In case of normal order situation, we usually ship within 24 hours after receipt of payment. The delivery of the order within Germany then takes 1-3 days later. 

Products that are specially made, or the delivery abroad take about more time.

Our LED-bars

The differences between these products depend on your individual lighting needs. The aquaLUMix provides a compact and highly powerful solution with all the light colors needed for an appealing daylight simulation. It also includes an integrated mount and the ability for heat recovery.

If you prefer a tailor-made lighting solution, then eco+ or PRO² might be a better option. These modular systems allow additional control over the arrangement, quantity, and length of individual LED bars. The choice depends on your vision of perfect lighting, whether you opt for the ready-made solution (aquaLUMix) or prefer a customizable system (eco+/PRO²).


eco+
An outstanding price-performance ratio
with a wide diversity of variants.


PRO²
Meets the highest demands
at maximum power
and innovative cooling


aquaLUMix
A new record
in performance, functionality
and quality

LED configuration

72 LEDs/m

144 LEDs/m

340 LEDs/m

Output

34W/m

53W/m

110W/m

Lumens

Up to approx. 3800 lm/m

Up to approx. 6500 lm/m

Up to approx. 14000 lm/m

Efficiency

Up to 112 lm/W

Up to 123 lm/W

Up to 140 lm/W

Available light colours, variants

12

11

4

Available lengths

7 (20-140cm)

6 (47-135cm)

7 (24-144cm)

Cooling

Passive by
aluminium cooling body
on the LED bar

Passive or
Heat recovery
(LED water cooling = aquarium heating)

Passive or
Heat recovery
(LED water cooling = aquarium heating)

Design

Slender, lightweight
with the minimum
dimensions

Compact LED bar
manufactured out of a solid
piece of aluminium

Solid, preconfigured
Compact lamp incl.
mounting solution

Cross section

18x12mm

32x18mm

94x28mm

Max. configuration of
lamp housing

4x eco+ LED bars in parallel

2x PRO² LED bars and
1x eco+ LED bar in parallel

1x aquaLUMix

The cable length for the eco+ and PRO² LED bars is 150cm. In order to extend the cables of the LED bars (150cm), which may be too short (to the installation site of the control unit), I recommend the extension cable by the metre with the solder connectors. 

For the aquaLUMix, powerBEAM and multiBEAM products, the cable length is 250cm and should not be extended.

A maximum cable length should always be kept as short as possible. There is a purely physical reason for this: the longer the cable, the higher the voltage drop, the less efficient the lighting. In addition, long cables behave like an antenna; the susceptibility to interference increases massively with the length of the cables. More than 3 m should therefore be avoided if possible.

The cable length of the power supply units is approx. 50cm on the input and output side.

We have tested RGBs extensively. The light produced, especially the white, which is probably mainly used, looks very unnatural or cold and artificial, usually with a blue tinge. You need to know that white light in RGBs is produced by mixing red, green and blue colours. Thus, the colour rendering quality and especially the light output falls far behind that of single-colour LEDs.

The fact that white light within an RGB chip is generated from the primary colours red, green and blue leads to another disadvantage. An RGB chip can only reproduce one light colour at a time. Example: White light for main lighting and a slowly appearing reddish light for a sunset are not possible. With RGB, all the light would turn red...from white to pink to red. With single-colour LEDs, you can have red, blue or white LED bars shine as you like, simultaneously or overlapping at different times.

LED bars are typically not available longer than 140 to 144cm as this is the maximum physical length. The reason for this is related to voltage drop: The longer the LED bar, the higher the voltage drop, and the less efficient it becomes. Therefore, anything over 140cm would hardly be economical. To create longer lighting solutions, one can combine various shorter LED bars, such as 2x100cm, 2x80cm, 80+100cm, etc.

As you probably already know, LEDs are sensitive to heat. A high luminous intensity inevitably also leads to a high LED operating temperature, which in turn has a direct effect on the service life of the LED. For this reason, a crucial and indispensable consideration in the design of LED products is how they cope with heat.

Ideally, the LEDs should be mounted "bare" on a good cooling body. The area of use – in aquariums – also makes it essential for the LEDs to have a watertight seal. There are three materials available for achieving all this: Epoxide (synthetic resin), polyurethane (PU) adhesive and silicon.

Most waterproof LED bars available on the market are sealed with epoxide, which means they are very inexpensive. However, from a technical point of view they are not the best choice because they quickly discolour and become brittle.

ClearSealing is a special production process in which a special high-performance silicone gives the LED bars a watertight seal. UV and temperature stable! Although this process results in longer production times and higher manufacturing costs, the characteristics it produces cannot fail to impress:

Temperature:

  • Our silicone has a much higher thermal conductivity than epoxide or PU and therefore has almost no effects on the service life. Our LED bars have the big advantage that the LEDs are permanently and directly attached to the cooling body. Thus the heat they create is directly and efficiently conducted away.

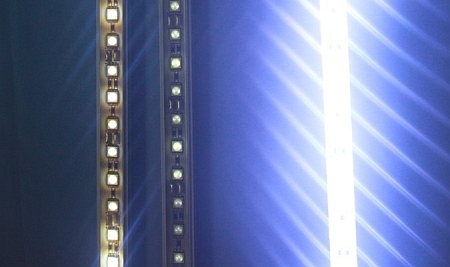
Left: LEDs in epoxide after 3 and 5 months respectively, right: LEDs in silicone after 6 months

External influences:

  • The chemical properties of epoxide and PU make the materials highly sensitive to external influences such as heat and moisture. Therefore they can quickly become very hard, stiff and brittle, which adversely affects their role as sealants. Our silicone is much more stable and retains its properties.

Transparency:

  • Our silicone is highly transparent, whereas epoxide and PU increasingly reduce the luminous intensity.

Beam angle:

  • The production process is specially designed for the materials used and their properties. Thus we are able to achieve a beam angle of almost 160° with ClearSealing technology. And we do that completely without reflectors or lenses!

UV stability:

  • Our silicone is much more UV stable. Epoxide and PU go yellow by comparison after just a few months even with a low proportion of UV light.

Left: LEDs in silicone after 1 + 3 months, right LEDs in epoxide after 1,2,3 months respectively.

Yes, all our LED bars (eco+, PRO², and aquaLUMix) as well as the spotBEAM and powerBEAM pendant lights are dimmable.

Can I simulate daylight with your LED products?

The lifespan of LED bars is about 40,000 operating hours under optimal conditions and proper care. This includes measures such as: regular external cleaning, using the CleanCover, avoiding heat build-up, avoiding persistent excessive wetness (not humidity), etc. Water cooling with the PRO and aquaLUMix products can be helpful but is not mandatory if there is sufficient ventilation.

Yes, of course, you can create your desired lighting effect with a mix of eco+ and PRO² LED bars. Our mains adapters and controls are compatible with both models (12V DC). In the choice of your LED bar holders, we would draw your attention to the instructions in the product descriptions. For example, the PRO² LED bars are compatible with only the "solo" version of our T5/T8 holders. The lamp housings can be configured either with a maximum of 4x eco+ or 2x PRO² and 1x eco+ LED bars.
The aquaLUMix can also be electrically combined with the eco + or PRO² LED bars in one system, but the fastening is done separately.

Yes, of course, but the following must be taken into account.
Compared to fresh water, seawater is an extremely aggressive medium and only very few materials can withstand direct and permanent contact. In order not to unnecessarily shorten the service life of the LED bars, appropriate precautions should be taken when using them in seawater. In addition to the CleanCoverns, an additional glass or acrylic pane on the aquarium is highly recommended to keep seawater away from the LED bars.

Depending on the size of the aquarium, our first recommendation is always aquaLUMix, spotBEAM or powerBEAM SEAWATER. With this lighting, you get an ideally balanced spectrum on the one hand and a lot of power on the other. To achieve an even more dominant blue peak in the spectrum or even in the UV range, these lights can be wonderfully combined with the eco+ ROYAL BLUE or the PRO² with UV.

To achieve the same performance values with only the individual eco+ or PRO² LED bars, a large number of units would be necessary, which complicates the entire handling up to the control unit.

The following applies to the eco+ and PRO² LED bars: The light colours REEF (11,000K) and CORAL (50% white, 33% blue, 17% red) together with the light colours POLAR (7,500K), MARINE (13,000K) and ROYAL BLUE (460nm) form a wide range for the best possible lighting of marine aquariums. Depending on the requirements of the stock, an individual light mixture can be selected in this way. You would have to determine the final number yourself; depending on the requirements of the stock, a corresponding number of LED bars are used. As a rough guide, at least 50% of the conventional light output should be selected in LED. So, for example, if you used to use 100W tube lighting, you should now use at least 50W LED lighting.

If the aquaLUMix or PRO² LED bars are chosen and the heat recovery function is to be used, we strongly recommend using the TITAN extension.

Yes. Our LED lamps are so effective and bright that they can be used for terraristics. LED lighting with the PLANT-GROW, among other things, is recommended, especially with a view to the planting.

However, since an enormous variety of different animal species can be considered for a terrarium, the stocking should be given special consideration when selecting and purchasing the LEDs. For technical reasons, normal LEDs quickly lack the UVA range completely, so it makes sense to use an additional light source if your terrarium or animals need to die. For this purpose you will find the PRO² LED bar in the MIX variant UVA SKY-GROW - full spectrum 2.0. This is perfect for use in terraristics, please note the product description!

Advantage in addition to the power consumption: LEDs only develop a small amount of waste heat, whoever uses them as additional lighting does not have to pay attention to additional heat development in the terrarium. Thanks to the special sealing of our LED strips (protection class IP67), use in high humidity is also possible without any problems. The CleanCover is also strongly recommended here.


We have complete confidence in LED bars made by brand-name manufacturers such as LG. We use an extremely efficient 5630 SMD LED with an excellent colour rendering index of up to 90 Ra (CRI)! These LEDs are perfect for use in aquariums, which demand very good colour rendering.

Why 5630/573 SMD LEDs?

  • High brightness combined with low electricity consumption
  • Very good colour rendering
  • Long service life
  • Very good price/performance ratio

Here is an overview of the SMD LEDs available on the market and their characteristics:


Ordinary standard chips

Ordinary standard chips

LG - high-power chips LEDaquaristik.de

Chip type

SMD 3528

SMD 5050

SMD 5630

Dimensions

3.5x2.8mm

5.0x5.0mm

5.6x3.0mm

Output

0.08W

0.24W

0.3W

Lumens

3-8 lm*

12-20 lm*

>35 lm*

Theoretically an SMD 5050 is 3-times brighter than an SMD 3528.
An SMD 5630 LED is 1.5-times brighter than an SMD 5050.

SMD stands for Surface-Mounted Device: In contrast to other LEDs, SMD LEDs are not connected by wires but are soldered directly onto the printed circuit board.
 
Advantages:

  • Very low heat emissions
  • Low voltage and current requirements
  • Compact size
  • More tolerant of mechanical vibration loads
  • Low terminal resistance and impedance
  • Low weight due to the absence of connecting wires

Choosing the Right Product

Our LED bars are specifically designed to cater to a wide array of needs and applications. Here are the specific possibilities:

eco+ LED bars: An offering of 12 single-color light options, suitable for various environments and requirements.

PRO² LED bars: 2 separately controllable light colors with a total of 8 combinations to choose from, to meet specific lighting needs.

aquaLUMix: Depending on the purpose, there are pre-configured light setups like FRESHWATER, AMAZON-GROW, AFRICAN-SUN, SEAWATER, divided into 4 separately controllable channels.

easyBEAM and flexBEAM: Pre-configured LED combinations as per need, like PLANT-MIX, DAY, SEAWATER, or DEEP BLUE, provide flexibility and convenience.

powerBEAM: Similar to aquaLUMix with pre-configured light setups like AMAZON-GROW, AFRICAN-SUN, SEAWATER, where the main light and white/blue moonlight are separately controllable.

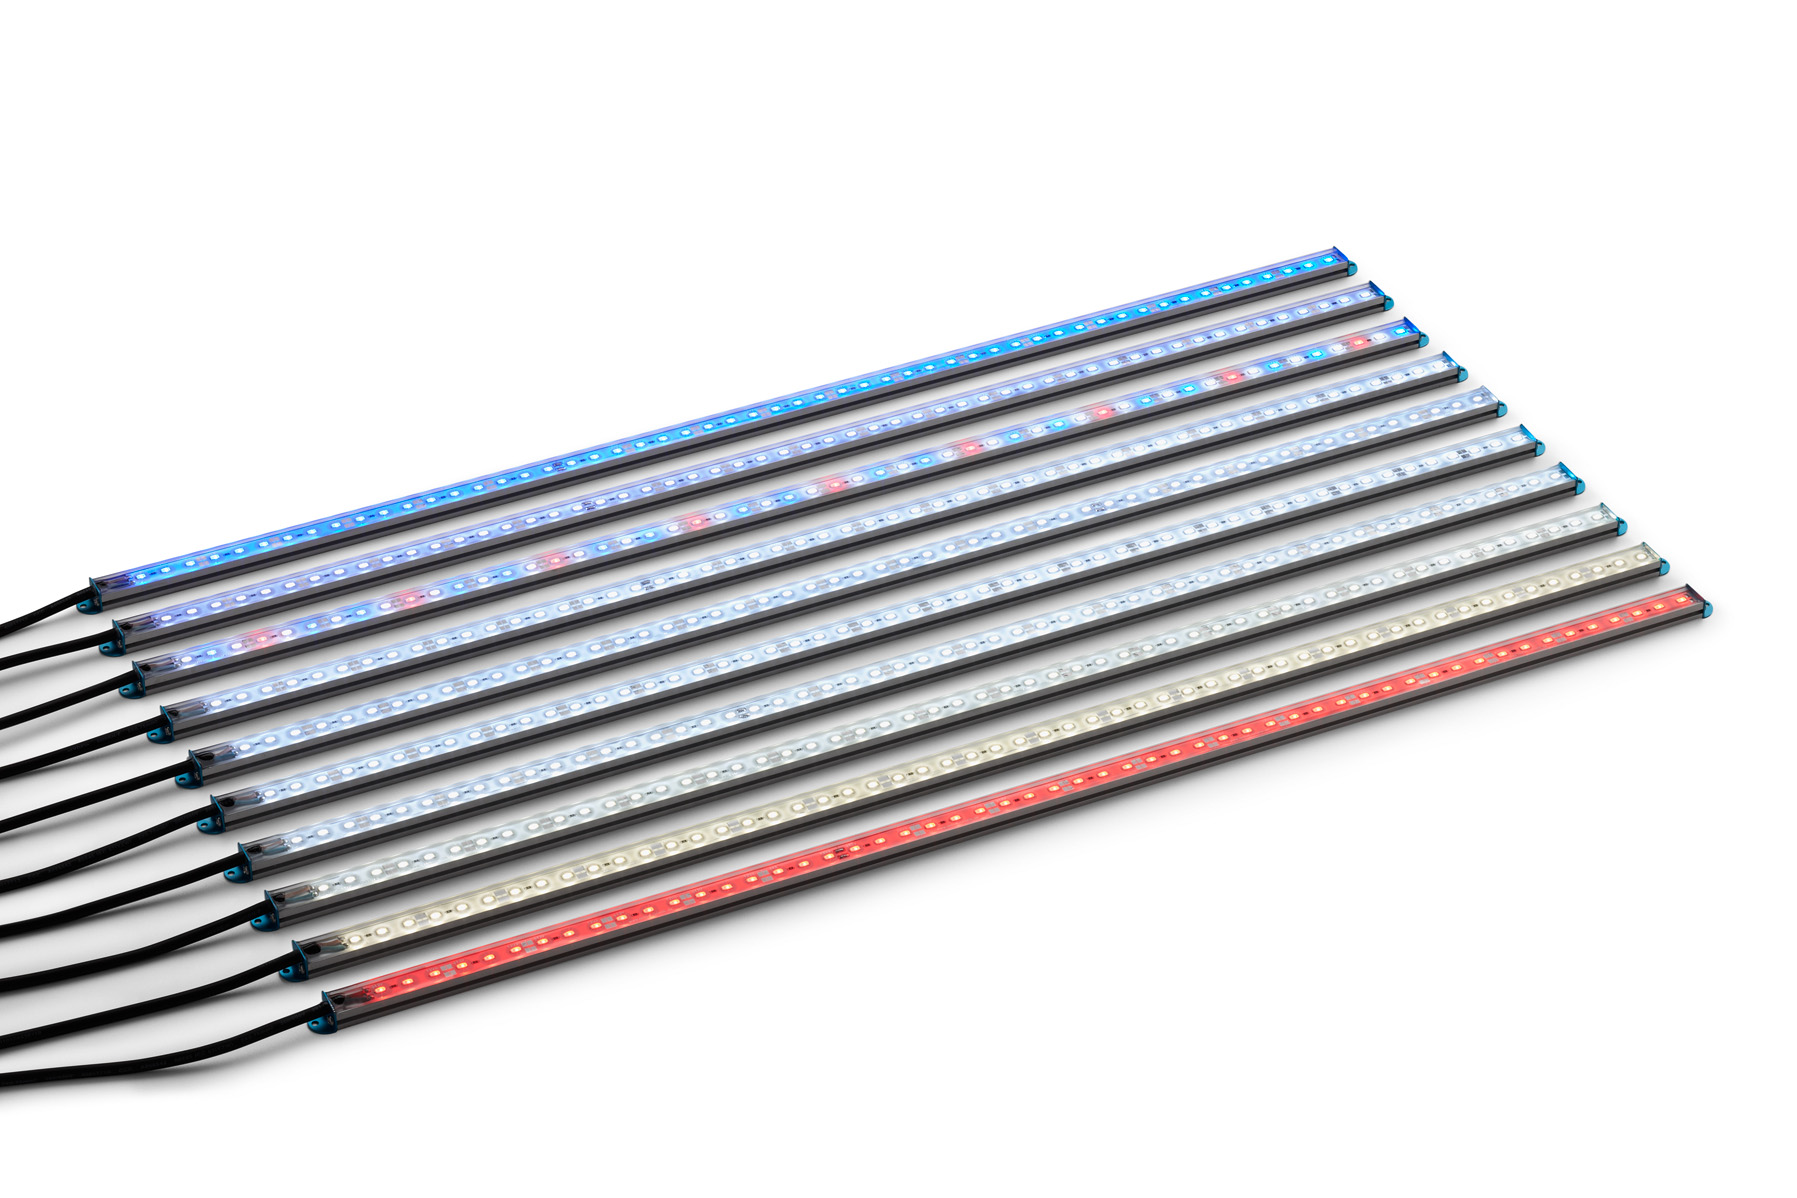
Our light colors, including PLANT-GROW, GROWx5, RED, SUNSET, TROPIC, DAY, SKY, POLAR, REEF, CORAL MIX, MARINE, ROYAL BLUE, are either available as individual LED bars (eco+) or partially as MIX LED bars (PRO²). This range enables promoting optimal growth of plants, enhancing the appearance of aquariums, or creating special light effects like sunrise and sunset.

Based on our extensive experience, we use a mix of these light colors in all other LED lighting solutions to provide the best lighting solution for your specific requirements.

Modul system eco+/PRO²

A convincing daylight simulation can be achieved with 2 light colours, e.g. SUNSET and DAY. Whether to use RED instead of SUNSET for sunrise and sunset is largely a matter of personal taste. The same applies to the actual "daylight". Our customers use everything from TROPIC, through DAY to MARINE.
Because plants and fish exhibit an infinite variety of colour, it is impossible to say what would be a perfect configuration. If it were possible, we would not offer today's 10 different colours ;-) but with this range of colours everyone is able to compose optimum and individual lighting conditions for their aquariums, be they East African, Amazonian, Asian etc.
If you prefer bluish colours, you should consider SKY, POLAR, REEF etc. Whereas, if orange and red colours are preferred or you have luxuriant planting schemes, the light colours SUNSET, TROPIC, DAY would be a good combination. RED and ROYAL BLUE come into play for creating special accents and effects.

Because our customers occasionally become uncertain when faced with such a wide choice, we suggest the following:
with a colour combination of SUNSET, DAY, POLAR (or if preferred TROPIC, DAY, SKY), the colour spectrum is well and broadly covered, which means it is difficult to go wrong. See Light comparison. Our experiences with this composition and planted aquariums have been very good. These light colours are also very suitable for daylight simulation systems. This is our recommended standard configuration.
Whether you choose to have 3 different series of lamps and light colours or restrict yourself to 1-2 depends on your particular aquarium lighting requirements. Depending on your requirements, you can also combine other light colours (RED = dawn reds, ROYAL BLUE = moonlight). Of course, you can add to this very easily at any time in the future. (Assuming the mains adapter has the required capacity)

Compact system aquaLUMix

The question as to the best choice of colour no longer arises with aquaLUMix as, based on years of experience, we've already equipped these compact lights with optimum light combinations. We offer 4 ready-configured lights for freshwater and seawater aquariums in a choice of 5 lengths, from 54 to 144cm. In the case of aquariums of over 144cm in length, two lights are simply combined together.

Depending on the inhabitants and set-up of your aquarium, as well as personal taste, you can choose one of 4 colour combinations - a fitting solution for every area:

  • FRESHWATER - Clear, bright colours for outstanding colour rendering, without being detrimental to plant growth. (e.g. for the classic company aquarium)
  • AMAZON GROW - A bright, tropical light with a focus on optimum plant growth, including Grow LEDs. (e.g. for thickly-planted Amazon or Asian aquariums)
  • AFRICAN SUN - A higher proportion of blue in the daytime light, augmented by a colour-intensifying light composition. (e.g. for cichlid aquarium with Malawis or Tanganyikas)
  • SEAWATER - Basically, a high proportion of blue with white and blue light, with additional special colours like red, violet and ultraviolet. (For seawater aquariums)

Every variation of the aquaLUMix is equipped with 4 separately controllable light channels, thus offering incomparable lighting options. Thus, besides light colours for general daytime lighting, LEDs for moonlight and sunrise are also integrated. In addition, a fastener, a splashguard and a water cooling system that can be used if necessary are already included. A suitable mains supply unit and, if desired, a light control or splitter should be ordered separately!

You'll find details on this light and colour configuration in the technical data further down this page.

For a planted aquarium, a special combination of light colors is recommended for vibrant plant growth. The GROWx5 and PLANT-GROW LED bars or those with a higher red component, such as SUNSET or TROPIC LED bars (3500 or 4500 Kelvin), are particularly suitable. A mix of SUNSET, DAY, POLAR (or alternatively TROPIC, DAY, SKY) covers almost the entire color spectrum. These combinations have proven effective and are excellent for day simulation. With less planting, combinations like SUNSET+SKY or TROPIC+POLAR might be a good choice. Red or reddish light, such as RED or GROWx5 and PLANT-GROW, further enhances growth and highlights red plants and fish. Our aquaLUMix compact lights are already optimally configured, with the AMAZON-GROW variant for optimal plant growth including GROW LED bars. The choice of light colors may also be a matter of personal taste.

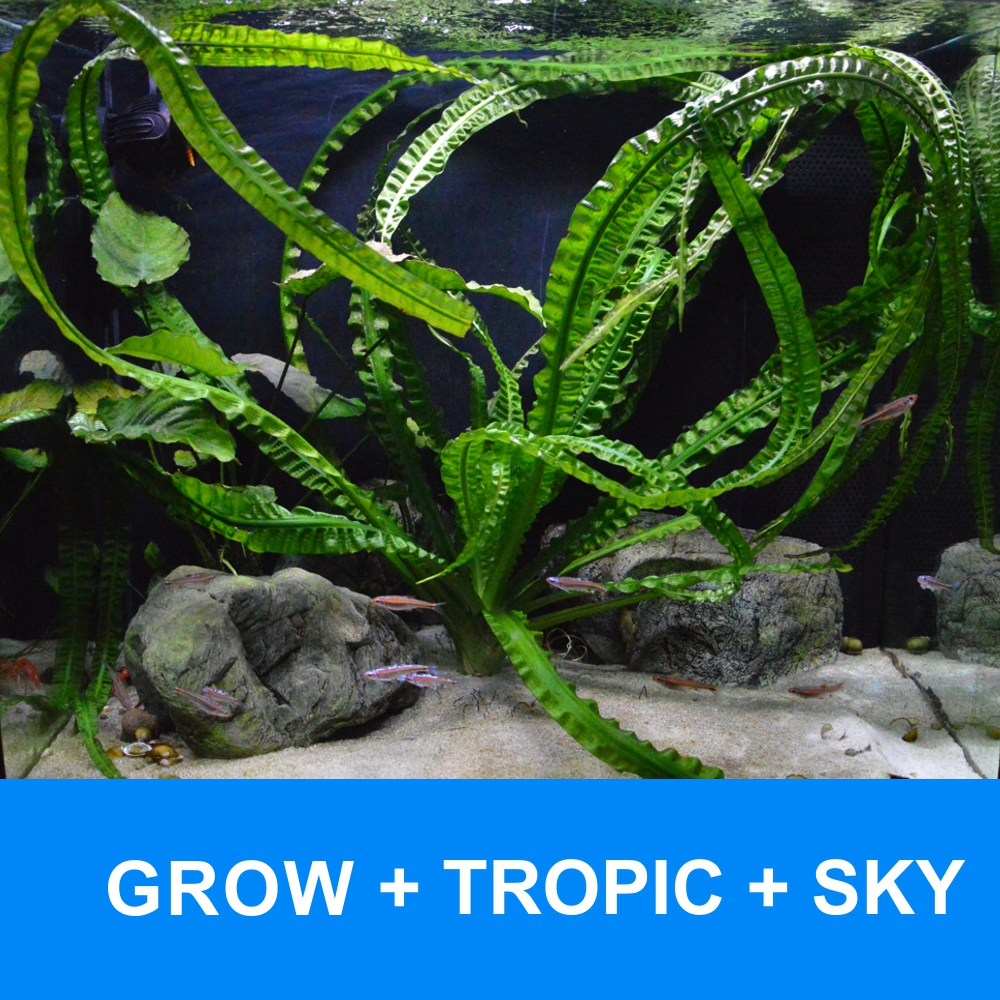
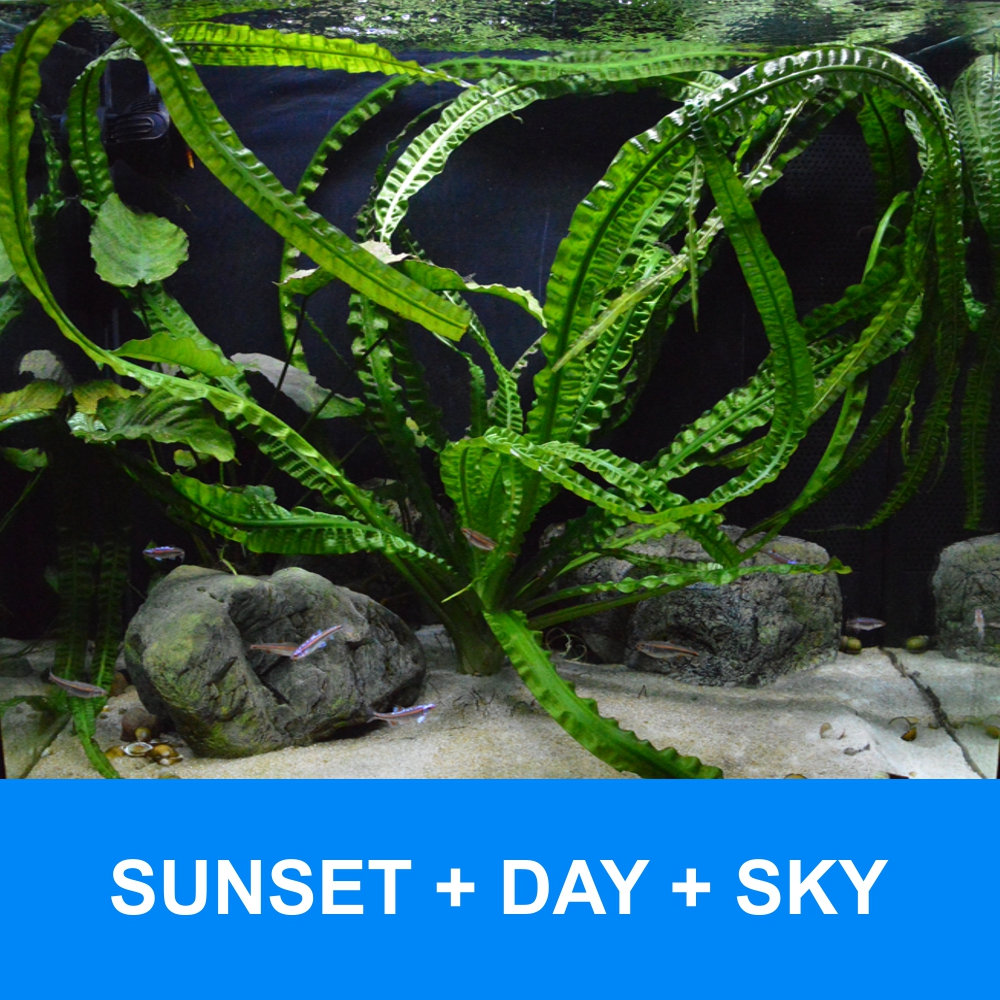
The following example shows a comparison of lighting configurations with and without GROWx5, which makes the basic advantages easier to see:


GROWx5 - TROPIC - SKY

SUNSET - DAY - SKY

Brightness

4-Stars

5-Stars

Lumens

Σ 4048 lm

Σ 5334 lm

Colour spectrum

5-Stars

4-Stars

Photosynthesis / growth

5-Stars

4-Stars

5-Stars

4-Stars

Colour rendering (CRI)

4-Stars

5-Stars

Photographic comparison

110,Medium

111_


For further combinations see Light comparison


Logic tells us that there are unlimited possibilities for combining our light colours. Of course, GROWx5 bars may also be combined with 1 or even 3 additional light colours. The advantages and disadvantages mentioned above must then be weighed up. And last but not least, the number of LED bars always depends on the type of lighting you want....!

For aquariums ranging in length from 120 to 140 cm, a single LED bar may be sufficient. However, the number of required LED bars depends on several factors:

- Aquarium Size: For example, a 120x50x50cm Malawi Lake aquarium is illuminated with one 50% dimmed LED bar, while a 300x90x70cm aquarium requires two bars.

- Plantation: Heavily planted Amazon aquariums around 120cm require two or three LED bars.

- Floor Color: A dark floor requires more light as it does not reflect light like a bright floor does.

- Demanding Plants: More light is needed for dense or demanding plantings.

- Individual Taste: Everyone has different preferences and expectations for lighting.

See Photos of our customers for further details.

Here is a non-binding overview to help you decide on the number of LED bars:


Degree of
planting

Plant light
requirements

Number of eco+ LED bars
or rows

Number ofPRO² LED bars
or rows

Number of aquaLUMix lamps

None or light

1

1

1

Medium

3-Stars

2

1-2

1

High

4-Stars

3-4

2

1

Extreme

4-Stars

4+

2+

1-2

The values relate to average tank heights and widths of about 60cm. The arrangement of the bars, central, offset, split, or placed next to one another is completely up to you. As is the choice of light colours!
Please note that every aquarium, including yours, is an individual one-off object and therefore the question of lighting cannot be decided remotely.


Comparison of GROWx5 and PLANT-GROW: GROWx5 is a unique light composition from 5 wavelengths that promotes optimal photosynthesis and healthy plant growth. PLANT-GROW, on the other hand, combines these light spectrums in one chip, is more subtle, and produces brighter, more even light. Both are designed as optional lights with "white" light colors, as they appear slightly purple/violet on their own. They enhance the overall color brilliance of your aquarium.

Operating Principle of GROWx5 and PLANT-GROW: They promote photosynthesis through a broader light spectrum. Red and Infrared: for lush plant growth. Blue Light: for lush green and compact growth. Green: supports photosynthesis by absorption through carotenoids and other auxiliary pigments, contrary to the widespread belief that green is only reflected.

The main difference between the aquaLUMix AMAZON-GROW and FRESHWATER LED bars lies in the light colors used. The AMAZON-GROW utilizes GROW LEDs, creating a warmer and more vibrant, yet natural light. This light is often preferred in community aquariums with lush vegetation and colorful fish stock. The FRESHWATER, on the other hand, has a clearer light color, dominated by daylight around the light color SKY, resulting in a slightly higher light output. It is particularly popular with aqua-scapers. The choice between the two ultimately comes down to personal and individual preference.

Moonlight in LED bars is typically the color ROYAL BLUE or alternatively MARINE. The products aquaLUMix, powerBEAM, and spotBEAM already have moonlight integrated, making them particularly suitable for this purpose.

Flap with folding lid Slide with sliding lid

With hinged cover system optionally with 1-3 center profiles

With puristic sliding lid consisting of 2 elements

Delivery optionally without cover plates for customer glazing. (for e.g. suspended lamps)

The lighting can be placed in the frame or freely attached to the carrier profiles. The lighting is placed in the frame, e.g. with the TRIO bracket for eco+and PRO².
The maximum length of the lighting is tank length -9cm The maximum length of the lighting is tank length -5cm
The minimum length of the lighting, none. The minimum length of the lighting when using the TRIO bracket is tank length -30cm.

LED bars (eco+, PRO², aquaLUMix)

LED bars are unique for their:

  • Uniform illumination across the entire length
  • Sleek design with a small cross-section
  • Various mounting options
  • Integration into standard flat aquarium covers
  • Complete dimmability and controllability
  • Easy expansion with additional colors and bars

LED spotlights (FlexBeam, easyBEAM)

LED spotlights, on the other hand, offer:

  • Top-down installation, suitable for open or glass-covered aquariums
  • Easy retrofitting of existing HQL installations
  • Limited light cone with focused illumination
  • Pronounced halo effect on the floor
  • Direct connection to 230V – not dimmable or controllable
  • No additional LED power supply needed

LED hanging light (powerBEAM)

The LED hanging light is ideal for large aquariums, as it:

  • Provides enormous light output with a small number of units
  • Is fully dimmable and controllable (with minor compromises)
  • Features integrated moonlight
  • Boasts a modern industrial design

Intended use

Our products and all parts included in the scope of delivery are intended exclusively for the illumination of aquariums, terrariums and plant cultivation in compliance with the technical data.

Safety instructions

The devices purchased may pose a risk to persons and property if they are used improperly or not in accordance with their intended use or if the safety instructions are not observed. Remove the packaging before putting the unit into operation!

  • The devices can be used by children aged 8 years and above and persons with reduced physical, sensory or mental capabilities or lack of experience and knowledge if they have been given supervision or instruction concerning use of the device in a safe way and understand the hazards involved. Children must not play with the device and must be supervised during cleaning and user maintenance.
  • Before use, visually inspect the device to ensure that it is undamaged, especially the power cord and plug.
  • Check that the LED bar is firmly seated before use.
  • The electrical devices may only be operated indoors.
  • Power supply unit, dimmer, controls or distributor must not be placed on or inside the aquarium cover!
  • Always disconnect the mains plug before working on the LED bar!
  • Operation only with the FI circuit breaker, max. 30 mA.
  • The mains plugs of the electrical devices must not get wet. Connect the mains plugs to the mains at a height so that there is a loop in the connecting cable where water could drip off.
  • The minimum distance of the LED bar to the water surface should be 50mm or the LED bar must not get wet permanently or repeatedly.
  • The light sources manufactured according to protection class IP67 can also be used inside an aquarium cover.
  • Explicitly not suitable for underwater use! LED spotlights manufactured to protection class IP44 must not be used inside a damp environment or even inside the aquarium cover.
  • LED bars of protection class IP67 cannot be opened and must be completely replaced if defective.
    Avoid looking directly into the switched-on LEDs for a longer period of time, otherwise you risk eye injuries! This applies in particular to UV LEDs.

Our products comply with the directives of the European Community (EU) and are therefore CE-compliant.

Connect the LED luminaire to the power supply adapter or distributor, dimmer or day simulation. See graphic on the right for connection sequence. Recommended tool: phase tester / screwdriver. 

Always observe the maximum load capacity and power of the individual products depending on the power supply unit used and the number of LED bars. Performance data can be found in the product descriptions / technical data. Always avoid overloading and incorrect polarity! 

Here you can see the colour coding:

The PRO² MIX LED bars have two independent light colours. These are connected separately: yellow/black and brown/blue respectively.  

Our LED bars do not have plugs. This has the advantage for you that any cable extensions are easily installed without causing great disruption. The other aspect is that plug and socket connections are always a source of potential failures.
The necessary items for connecting to other accessories will be supplied to suit the rest of the order. Mains adapters, dimmers, distributors and controls generally come with their own connections and plugs.

The minimum distance between the LED bar and the water surface should be 50mm or the LED bar must not get wet permanently or repeatedly.
Our LED bars (eco+, PRO² and aquaLUMix) are manufactured according to protection class IP67 and can also be used inside a wet aquarium cover. Not suitable for underwater use! 
Choose a ventilated place for the LED bar. The LED bar cools passively via the ambient air; there must be sufficient air circulation. Complete enclosure leads to a build-up of heat and impairs the service life. With closed aquarium covers, the existing openings for cables and hoses are usually sufficient for ventilation. If an above-average amount of LED lighting is installed, observe the heat development in the cover and create additional openings for ventilation if necessary.

Aquarium Covers

Glossary

Here we present our glossary, which contains carefully compiled definitions and explanations of key terms relating to our aquarium covers. This glossary serves as a handy resource to help you gain a deeper understanding of the specific features, options and configurations of our products. Whether you are an experienced aquarist or just starting out on your aquarium adventure, this collection of term explanations will help you make the best possible decisions for your aquarium and its equipment. Dive into the world of aquarium coverings with our comprehensive glossary designed to clarify your questions and expand your knowledge.

Aluminium composite panel

This material (also known as sandwich panel) is used for the cover panels of our covers and consists of a robust plastic core coated on both sides with 0.3 mm thick aluminium. They are waterproof and therefore ideal for use above water. The upper side is kept in a maximum similar colour to the frame, while the underside is highly reflective and mirror-like, which optimises the light yield in the aquarium. The overall thickness is around 3 mm. The panels are covered with a protective film on both sides to protect them during transport.

Wide side

In relation to aquarium covers, the wide side refers to the shorter side of the aquarium or glass tank. It is the side that is usually referred to as the side pane. This measurement is crucial when choosing the right size for aquarium covers to ensure an exact fit and optimum functionality.

deLUX

The deLUX series stands for high-quality aquarium covers made of first-class aluminium. This series is characterised by precise manufacturing processes that guarantee minimal gaps and impressive stability. The covers are available in the colours titanium grey and white. The frame profiles in titanium grey are fully anodised, which makes them corrosion-resistant, while the white frames are powder-coated, both with a matt, brushed finish. A characteristic feature of the deLUX series is that it is only available in common standard sizes, unlike the Vario series, which offers customised solutions with a high-quality plastic frame. A gravel screen that matches the deLUX series is not available.

Cover layout

The cover layout defines the number and arrangement of the central profiles in an aquarium cover, which depends largely on the width of the cover. The layout is designed to optimise the functionality and manageability of the cover flaps. For example, two central profiles are possible from a width of 50 cm and three central profiles only from a width of 80 cm in order to ensure practical handling and sufficient opening sizes. To prevent the lid flaps from becoming too large and heavy, one central profile is provided up to a width of 70 cm and two central profiles up to a maximum width of 110 cm. 

The resulting systems can be designed as a two-part hinged lid system (one support profile with two lid flaps), a three-part hinged lid system (two central profiles with one centre section and two lid flaps) or a four-part hinged lid system (three support profiles with two centre sections and two lid flaps). The positioning and spacing of the support profiles are evenly distributed across the width of the aquarium, although individual adjustments can be made using the 'Customised cover layout' service. All support profiles are aligned parallel to the long side of the aquarium cover.

Flap

In our aquarium covers, "flap" refers to a hinged lid system that allows easy access to the aquarium. The design with hinged lids allows the lid flaps to either be raised or removed completely if required. Depending on the model and size of the cover, the lid flaps are supported by one to three support profiles to ensure optimum stability. To simplify handling and increase stability, the cover flaps are manufactured in two sections for lengths over 126 cm, three sections for lengths over 246 cm and four sections for lengths over 366 cm.

Retaining bridges

Retaining bridges are special fastening elements for the integration of LED bars (eco+ and PRO) into the support profile of the Flap aquarium covers. These retaining bridges enable safe and flexible flexible installation of the LED lighting. The standard scope of delivery includes two bridges are included for covers up to 125 cm in length, while four retaining bridges are included for covers longer than 126 cm. are included. Additional retaining bridges can be ordered separately if required. The LED bars are attached directly to the retaining bridges using self-tapping screws. directly to the retaining bridges using self-tapping screws, with the central groove on the The central groove on the back of the LED bar serves as a fixing point. This design This design ensures maximum flexibility both in the positioning of the bridges on the LED bar as well as the choice of mounting location in the support profile. support profile. A maximum of four eco+ LED bars or two PRO² and one eco+ LED bar can be mounted in parallel. For the aquaLUMix LED bars do not require retaining bridges.

Gravel panel

A gravel panel is a decorative element that serves to conceal the bottom edge of the aquarium and everything underneath it. It is ideal for concealing the sand, gravel or any debris so that the aquarium always looks neat and aesthetically pleasing. Our gravel screens are available in different heights (5 cm or 7 cm) and can be ordered for one to four sides of the aquarium as required. With a material thickness of 2 mm, they are robust and durable. The texture and colour of the gravel covers are matched to the Vario series of our aquarium covers; we cannot offer exactly matching gravel covers for the deLUX series. Installation is simple and straightforward thanks to the self-adhesive backing. The gravel cover can also be used as a dirt or water level cover in the upper section of the aquarium if it does not have a cover.

Long side

For aquarium covers, the long side refers to the longer side of the aquarium or glass tank, i.e. the front and back of the tank. This measurement is essential for determining the right size of cover to ensure perfect coverage and functionality.

Groove

The frame of our aquarium covers has a circumferential groove as an alternative fixing point for our eco+ and PRO² LED systems. This makes it possible to mount them directly in the frame at 90° to the water surface, with free choice of position. Perfectly suited for the very special effects of light simulation, e.g. for a horizontally illuminated moonlight or sunset over the water surface.

Self-glazing

The "for self-glazing" option for a Slide aquarium cover means that the cover is supplied without the usual cover elements. This option allows the customer to use their own customised cover elements, such as glass panels. Although the cover comes without cover elements, the required E-profiles, which are necessary for the functionality of the sliding cover system, are included in the scope of delivery. This offers a flexible solution for aquarists who want to design a customised cover with their own materials.

Slide

Slide is the name of our aquarium covers with sliding lid system with their purist and sleek design and easy sliding technology. The Slide system, in which cover elements are slid to the side, is suitable for aquarium sizes from 60x30 to 400x70 cm. The two- or four-part sliding cover with handle holes guarantees easy handling and maximum accessibility. A sealing lip for the top panel ensures that dripping condensation is removed from the bottom panel. And the special feature: The insides of the cover plates reflect the light so that no light is lost.

Dirt and water level screen

The attached frame of our aquarium covers covers the upper 38 mm of the aquarium and thus forms an integrated XL dirt and water level screen that ensures a clean and undisturbed field of vision all round.

Bar

In addition, our frame profile also offers a circumferential bar for fastening by hanging or setting up lighting with corresponding fastening options. The separately available TRIO holder for U-profile is the ideal accessory and the perfect complement. As are the standard bracket mounts for the aquaLUMix and PRO² LED bars. This allows the lighting to be freely positioned in the frame and moved as required.

Technical cut-outs

Technical cut-outs are specially designed cut-outs in the aquarium cover that can be fitted either on a wide side or long side. These cut-outs are intended for the installation and passage of aquarium technology such as filter supply lines, heaters, cables or similar. There is also the option of choosing an aquarium cover without technology cut-outs if no external devices are to be installed. The width and position of the technology cut-outs vary depending on the model and size of the aquarium cover selected, whereby the height of the cut-out is always 36 mm from the top edge of the glass. Detailed information on the available configurations of the technical cut-outs can be found in the product description of the respective model.

Central profile

The Flap aquarium cover has 1 to 3 central profiles to accommodate our eco+, PRO², spotBEAM and aquaLUMix LED systems, depending on the cover layout. This means that ideal light distribution is always possible, depending on the depth and surface area of the tank. The eco+ and PRO² LED bars are inserted and fastened directly into the central profile using the enclosed retaining brackets, while the aquaLUMix and spotBEAM are inserted and fastened directly into the central profile. In addition, the cover flaps are inserted into the support profile or set up vertically when opened. The central profiles are inserted into the frame of the cover without any further fixing and can therefore be easily moved and removed as required.

Vario

The Vario series of our aquarium covers is characterised by its high-quality, high-gloss plastic frames, which are available in black, white and mottled grey. This series offers the possibility of millimetre-precise production to the customer's individual desired dimensions, with a maximum length of up to 400 cm. For a harmonious and uniform look, matching gravel covers in the corresponding colours can be added as an option. The Vario series is therefore ideal for aquarists who value an individual, customised design for their aquarium. 

Customisation is easy with us: in our shop you will find a variety of sizes in 5-10cm increments. If your aquarium is a special size, simply select the next larger standard length and specify your exact measurements when finalising your order. Our experts will take all the necessary details into account to ensure a perfect fit.

deLUX made of Aluminum Vario made of Plastic
Frame profiles made of anodized aluminum or matte brushed powder-coated. Frame profiles in high-gloss plastic.
Available only in standard sizes as selectable in the shop. In addition to standard sizes, millimeter-precise cuts to custom dimensions are possible.
Available colors Titanium Gray or White. Available colors White, Gray mottled, or Black
Maximum length up to 200cm Maximum length up to 400cm
Fixed technical cutouts, see product description Flexible technical cutouts in position and size
Matching gravel strip available

Note that with deLUX, custom sizes are not possible and only standard sizes are offered, while Vario allows for millimeter-precise adjustments and can be complemented with a matching gravel blend on request for a stylish look.

We offer Vario aquarium covers and gravel strips in a variety of directly selectable sizes in 5-10cm increments, which already cover 90% of the common aquarium sizes. However, if your aquarium has a special dimension, that's no problem. Simply choose the next larger standard length and specify your exact measurement when completing your order. For example, for a 97.5cm aquarium, select 100cm and then specify the exact 975mm in the last step at the checkout. Our experts will take care of details like the safety margin and ensure that your cover or gravel strip fits perfectly!

Flap with folding lid Slide with sliding lid

With hinged cover system optionally with 1-3 center profiles

With puristic sliding lid consisting of 2 elements

Delivery optionally without cover plates for customer glazing. (for e.g. suspended lamps)

The lighting can be placed in the frame or freely attached to the carrier profiles. The lighting is placed in the frame, e.g. with the TRIO bracket for eco+and PRO².
The maximum length of the lighting is tank length -9cm The maximum length of the lighting is tank length -5cm
The minimum length of the lighting, none. The minimum length of the lighting when using the TRIO bracket is tank length -30cm.

With the Flap cover and folding lid, the center profile (which also supports the cover flaps) is particularly suitable for accommodating the lighting. Depending on the lighting, it can be screwed to the profile or pushed in:

The frame of our aquarium covers has a circumferential bar for mounting by hanging or setting up lighting with the corresponding mounting option. The separately available TRIO holder for U-profile is the ideal accessory and the perfect complement. As are the standard bracket mounts for the aquaLUMix and PRO² LED bars. This allows the lighting to be freely positioned in the frame and moved as required.

In addition, our frame profile also offers a circumferential groove as an alternative fixing point for our eco+ and PRO² LED systems. This allows mounting directly in the frame at 90° to the water surface, with free choice of position. Perfectly suited for the very special effects of light simulation, e.g. for a horizontally illuminated moonlight or sunset over the water surface.

Installation

Glossary

Here we present our glossary, which contains carefully compiled definitions and explanations of key terms relating to our aquarium covers. This glossary serves as a handy resource to help you gain a deeper understanding of the specific features, options and configurations of our products. Whether you are an experienced aquarist or just starting out on your aquarium adventure, this collection of term explanations will help you make the best possible decisions for your aquarium and its equipment. Dive into the world of aquarium coverings with our comprehensive glossary designed to clarify your questions and expand your knowledge.

Aluminium composite panel

This material (also known as sandwich panel) is used for the cover panels of our covers and consists of a robust plastic core coated on both sides with 0.3 mm thick aluminium. They are waterproof and therefore ideal for use above water. The upper side is kept in a maximum similar colour to the frame, while the underside is highly reflective and mirror-like, which optimises the light yield in the aquarium. The overall thickness is around 3 mm. The panels are covered with a protective film on both sides to protect them during transport.

Wide side

In relation to aquarium covers, the wide side refers to the shorter side of the aquarium or glass tank. It is the side that is usually referred to as the side pane. This measurement is crucial when choosing the right size for aquarium covers to ensure an exact fit and optimum functionality.

deLUX

The deLUX series stands for high-quality aquarium covers made of first-class aluminium. This series is characterised by precise manufacturing processes that guarantee minimal gaps and impressive stability. The covers are available in the colours titanium grey and white. The frame profiles in titanium grey are fully anodised, which makes them corrosion-resistant, while the white frames are powder-coated, both with a matt, brushed finish. A characteristic feature of the deLUX series is that it is only available in common standard sizes, unlike the Vario series, which offers customised solutions with a high-quality plastic frame. A gravel screen that matches the deLUX series is not available.

Cover layout

The cover layout defines the number and arrangement of the central profiles in an aquarium cover, which depends largely on the width of the cover. The layout is designed to optimise the functionality and manageability of the cover flaps. For example, two central profiles are possible from a width of 50 cm and three central profiles only from a width of 80 cm in order to ensure practical handling and sufficient opening sizes. To prevent the lid flaps from becoming too large and heavy, one central profile is provided up to a width of 70 cm and two central profiles up to a maximum width of 110 cm. 

The resulting systems can be designed as a two-part hinged lid system (one support profile with two lid flaps), a three-part hinged lid system (two central profiles with one centre section and two lid flaps) or a four-part hinged lid system (three support profiles with two centre sections and two lid flaps). The positioning and spacing of the support profiles are evenly distributed across the width of the aquarium, although individual adjustments can be made using the 'Customised cover layout' service. All support profiles are aligned parallel to the long side of the aquarium cover.

Flap

In our aquarium covers, "flap" refers to a hinged lid system that allows easy access to the aquarium. The design with hinged lids allows the lid flaps to either be raised or removed completely if required. Depending on the model and size of the cover, the lid flaps are supported by one to three support profiles to ensure optimum stability. To simplify handling and increase stability, the cover flaps are manufactured in two sections for lengths over 126 cm, three sections for lengths over 246 cm and four sections for lengths over 366 cm.

Retaining bridges

Retaining bridges are special fastening elements for the integration of LED bars (eco+ and PRO) into the support profile of the Flap aquarium covers. These retaining bridges enable safe and flexible flexible installation of the LED lighting. The standard scope of delivery includes two bridges are included for covers up to 125 cm in length, while four retaining bridges are included for covers longer than 126 cm. are included. Additional retaining bridges can be ordered separately if required. The LED bars are attached directly to the retaining bridges using self-tapping screws. directly to the retaining bridges using self-tapping screws, with the central groove on the The central groove on the back of the LED bar serves as a fixing point. This design This design ensures maximum flexibility both in the positioning of the bridges on the LED bar as well as the choice of mounting location in the support profile. support profile. A maximum of four eco+ LED bars or two PRO² and one eco+ LED bar can be mounted in parallel. For the aquaLUMix LED bars do not require retaining bridges.

Gravel panel

A gravel panel is a decorative element that serves to conceal the bottom edge of the aquarium and everything underneath it. It is ideal for concealing the sand, gravel or any debris so that the aquarium always looks neat and aesthetically pleasing. Our gravel screens are available in different heights (5 cm or 7 cm) and can be ordered for one to four sides of the aquarium as required. With a material thickness of 2 mm, they are robust and durable. The texture and colour of the gravel covers are matched to the Vario series of our aquarium covers; we cannot offer exactly matching gravel covers for the deLUX series. Installation is simple and straightforward thanks to the self-adhesive backing. The gravel cover can also be used as a dirt or water level cover in the upper section of the aquarium if it does not have a cover.

Long side

For aquarium covers, the long side refers to the longer side of the aquarium or glass tank, i.e. the front and back of the tank. This measurement is essential for determining the right size of cover to ensure perfect coverage and functionality.

Groove

The frame of our aquarium covers has a circumferential groove as an alternative fixing point for our eco+ and PRO² LED systems. This makes it possible to mount them directly in the frame at 90° to the water surface, with free choice of position. Perfectly suited for the very special effects of light simulation, e.g. for a horizontally illuminated moonlight or sunset over the water surface.

Self-glazing

The "for self-glazing" option for a Slide aquarium cover means that the cover is supplied without the usual cover elements. This option allows the customer to use their own customised cover elements, such as glass panels. Although the cover comes without cover elements, the required E-profiles, which are necessary for the functionality of the sliding cover system, are included in the scope of delivery. This offers a flexible solution for aquarists who want to design a customised cover with their own materials.

Slide

Slide is the name of our aquarium covers with sliding lid system with their purist and sleek design and easy sliding technology. The Slide system, in which cover elements are slid to the side, is suitable for aquarium sizes from 60x30 to 400x70 cm. The two- or four-part sliding cover with handle holes guarantees easy handling and maximum accessibility. A sealing lip for the top panel ensures that dripping condensation is removed from the bottom panel. And the special feature: The insides of the cover plates reflect the light so that no light is lost.

Dirt and water level screen

The attached frame of our aquarium covers covers the upper 38 mm of the aquarium and thus forms an integrated XL dirt and water level screen that ensures a clean and undisturbed field of vision all round.

Bar

In addition, our frame profile also offers a circumferential bar for fastening by hanging or setting up lighting with corresponding fastening options. The separately available TRIO holder for U-profile is the ideal accessory and the perfect complement. As are the standard bracket mounts for the aquaLUMix and PRO² LED bars. This allows the lighting to be freely positioned in the frame and moved as required.

Technical cut-outs

Technical cut-outs are specially designed cut-outs in the aquarium cover that can be fitted either on a wide side or long side. These cut-outs are intended for the installation and passage of aquarium technology such as filter supply lines, heaters, cables or similar. There is also the option of choosing an aquarium cover without technology cut-outs if no external devices are to be installed. The width and position of the technology cut-outs vary depending on the model and size of the aquarium cover selected, whereby the height of the cut-out is always 36 mm from the top edge of the glass. Detailed information on the available configurations of the technical cut-outs can be found in the product description of the respective model.

Central profile

The Flap aquarium cover has 1 to 3 central profiles to accommodate our eco+, PRO², spotBEAM and aquaLUMix LED systems, depending on the cover layout. This means that ideal light distribution is always possible, depending on the depth and surface area of the tank. The eco+ and PRO² LED bars are inserted and fastened directly into the central profile using the enclosed retaining brackets, while the aquaLUMix and spotBEAM are inserted and fastened directly into the central profile. In addition, the cover flaps are inserted into the support profile or set up vertically when opened. The central profiles are inserted into the frame of the cover without any further fixing and can therefore be easily moved and removed as required.

Vario

The Vario series of our aquarium covers is characterised by its high-quality, high-gloss plastic frames, which are available in black, white and mottled grey. This series offers the possibility of millimetre-precise production to the customer's individual desired dimensions, with a maximum length of up to 400 cm. For a harmonious and uniform look, matching gravel covers in the corresponding colours can be added as an option. The Vario series is therefore ideal for aquarists who value an individual, customised design for their aquarium. 

Customisation is easy with us: in our shop you will find a variety of sizes in 5-10cm increments. If your aquarium is a special size, simply select the next larger standard length and specify your exact measurements when finalising your order. Our experts will take all the necessary details into account to ensure a perfect fit.

There are several options available for mounting LED bars:

  • Use our aquarium cover and insert the LED bars into the center profile.
  • Special brackets allow for the mounting of LED bar(s) in existing T5 or T8 damp-proof housings.
  • Silicone stands enable simple placement of the LED bar on cross or longitudinal braces or cover plates.
  • Our aluminium lamp housing in modern design is suitable for open or glass/acrylic-covered aquariums, and can be individually equipped with our LED bars.
  • With the LED adapter profile, JUWEL and EHEIM aquariums can be quickly upgraded to modern LED lighting.
  • The U-profile serves as a longitudinal or cross-support for LED bars, enabling easy and flexible mounting of the lighting.
  • If you do not select any of the above brackets, 2 screws 2.9x6.5mm are included in the package that can be used to directly attach the LED bar.
  • Under individual and spare parts, you can find everything for a customized mounting.

The aquaLUMix comes with an adjustable bracket and other mounting solutions. The spotBEAM can either be mounted with a separately available gooseneck or integrated with other LEDaquaristik mounting solutions.

Yes, the LED bars are specifically designed to be installed in existing, enclosed covers. Due to their waterproof rating (IP67), they are suitable for moist aquarium covers but should not be placed directly underwater. Persistent dampness and deposits like lime and dirt may impair the quality and lifespan of the LED bars. Thus, we recommend using our special CleanCover to protect the LED bars. The LED bars cool passively through the ambient air, so adequate air circulation is crucial. In most cases, the existing openings for cables and hoses in the cover are sufficient for this purpose.

When mounting LED bars, it is essential to choose an attachment that suits the existing ceiling texture and construction. Our cable systems come with standard anchors and screws, but these may be unsuitable for your specific on-site situation. Therefore, it's recommended to check and adjust the attachment materials according to the individual requirements.

The minimum distance between the LED bar and the water surface should be 50mm or the LED bar must not get wet permanently or repeatedly.
Our LED bars (eco+, PRO² and aquaLUMix) are manufactured according to protection class IP67 and can also be used inside a wet aquarium cover. Not suitable for underwater use! 
Choose a ventilated place for the LED bar. The LED bar cools passively via the ambient air; there must be sufficient air circulation. Complete enclosure leads to a build-up of heat and impairs the service life. With closed aquarium covers, the existing openings for cables and hoses are usually sufficient for ventilation. If an above-average amount of LED lighting is installed, observe the heat development in the cover and create additional openings for ventilation if necessary.

You have a completely free choice in this. We recommend you take a few minutes and test various alternatives. Then decide on which one looks the best to you. From our experience, a beautiful optical effect of depth is created when warm light colours (low Kelvin values) are placed towards the back with brighter whiter light colours towards the front. Moonlight, on the other hand, is better at the back. The influence of any specific positional order depends on  how closely the individual LED bars or light colours are installed together.

The feet (2 per set) enclose the LED bar precisely and can be moved freely on it. Made of transparent and non-slip silicone, they give the LED bar a firm hold. This makes it easy to place the LED bar, for example, on the transverse or longitudinal struts or on the cover pane.
Of course also suitable for use with a CleanCover.

With the Flap cover and folding lid, the center profile (which also supports the cover flaps) is particularly suitable for accommodating the lighting. Depending on the lighting, it can be screwed to the profile or pushed in:

The frame of our aquarium covers has a circumferential bar for mounting by hanging or setting up lighting with the corresponding mounting option. The separately available TRIO holder for U-profile is the ideal accessory and the perfect complement. As are the standard bracket mounts for the aquaLUMix and PRO² LED bars. This allows the lighting to be freely positioned in the frame and moved as required.

In addition, our frame profile also offers a circumferential groove as an alternative fixing point for our eco+ and PRO² LED systems. This allows mounting directly in the frame at 90° to the water surface, with free choice of position. Perfectly suited for the very special effects of light simulation, e.g. for a horizontally illuminated moonlight or sunset over the water surface.

Water Cooling or Heat Recovery with PRO² and aquaLUMix

LED water cooling offers several benefits. Firstly, it ensures optimal cooling for the LED bars and effectively uses their waste heat to warm the aquarium. LEDs, whether used at home or in aquaristics, lose luminosity over time. The indicated LED lifespan, such as 40,000 hours, means that the LED will only have 50% of its original brightness after this period. Proper cooling can significantly mitigate this decline in performance.

Although the temperature-optimized aluminum profile already allows for passive cooling, active water cooling is often superior. Water cooling channels the heat energy, which is wasted in traditional LED bars, into the aquarium water, thereby reducing the load on the aquarium heater. This makes LED water cooling with heat recovery a significant advantage for aquarists.


The result provides an indication of how much the heat recovery system contribute to heating your aquarium water (= relieving the load on the aquarium heating = saving energy). Please note that the calculation does not take into account any other sources of heat, such as pumps or heating elements.
Calculation of the water temperature
when using heat recovery

Length cm
Width cm
Water level cm
Water or room temperature °C

Insulates surfaces

Model Length/Variant Quantity
 

Temperature to be expected


When using with sea water or deviant fresh water (eg very low PH), we recommend using the TITAN upgrade.


Advantages:

Optimal Temperature Control: The LEDs operate within the optimal temperature range to maximize luminous duration and performance.

Heat Recovery: The LED water cooling utilizes the waste heat from the LEDs to supply warm water to the aquarium.

Energy Efficiency: The power consumption of the aquarium heater is significantly reduced. LED bars with heat recovery pay off much faster.

Efficient Water Cooling: Two integrated XL channels for water cooling provide high flow rates, excellent cooling properties, and maximum efficiency. The system is virtually maintenance-free.

Flexibility: Connect the water cooling of several PRO² LED bars together.

Noiseless Operation: Our system offers noiseless operation for an undisturbed aquarium experience.

Special Features:

Integrated Water Cooling: Our aluminum profile allows unhindered heat exchange between LED and cooling water, while competitors have lower efficiency.

High-quality Construction: The XL channels carry 56% more water for superior cooling properties. Easy accessibility simplifies cleaning. Silicone hose and 180° bend are made of high-quality material for durability and shape stability.

The lifespan of LED bars is about 40,000 operating hours under optimal conditions and proper care. This includes measures such as: regular external cleaning, using the CleanCover, avoiding heat build-up, avoiding persistent excessive wetness (not humidity), etc. Water cooling with the PRO and aquaLUMix products can be helpful but is not mandatory if there is sufficient ventilation.

The use of water cooling is an advantage, but not mandatory. The temperature-optimised aluminium profile of the PRO² LED bara and aquaLUMix also provides passive cooling. But with active water cooling, the LEDs are optimally cooled, the waste heat from the LEDs is put to effective use and the aquarium is heated. So if the seasonal temperature fluctuations are large enough, these LED bars can be operated without a water cooling system in midsummer.

Compared to fresh water, seawater is extremely aggressive and would permanently damage the aluminium of our LED luminaires if the water cooling system was not used. The optional TITAN extension for a seawater application of the water cooling system contains two titanium tubes, made of 100% pure titanium, which are inserted into the cooling channels of the lighting. Contact between aluminium and seawater is thus excluded. The titanium tubes are 100% resistant to seawater.
The installation is very simple. The four existing hose connections are to be removed/screwed off. The titanium tubes are pushed in, the hoses are pushed on and additionally secured with the enclosed hose clamps.

Specifications

No, that is not necessarily the case. "K" stands for Kelvin and merely tells us something about the light colour. Brightness is given in lumen (lm). Experience shows that light colours in the 6000 to 7000 Kelvin range appear to the eye to be the brightest. The further a light colour deviates from this range the less bright it will appear to the human eye.

No, because 12V is not really 12V. A stabilised DC mains adapter is necessary for LEDs. That means it must output a voltage of 12V DC. An ordinary 12V transformer for halogen bulbs is unsuitable here. The consequences of using one of these could be no light, flickering or even damage.

Comparison of the properties of T8 and T5 tubes made by established manufacturers with LED bars from LEDaquaristik

Manufacturer Description Light colour
(Kelvin)
Light output
(Lumen)
Output
(Watt)
Efficiency
(Lumen/Watt)
Dennerle
 
T8 Amazon-Day
895 mm
6000 2300 30 76
Eheim T8 freshpower daylight
895 mm
6500 2350 30 78
JBL T8 Solar Tropic
895 mm
4000 1650 30 55
Sera T8 tropic sun
895 mm
4700 1600 30 53
Hagen T8 Sunglo
895 mm
4200 2100 30 70
T5
Dennerle T5 Amazon-Day
850 mm
6000 3250 39 89
Giesemann T5 Tropic
850 mm
6500 2450 39 63
Eheim T5 freshpower daylight
850 mm
6500 3300 39 85
JBL T5 Ultra Tropic
850 mm
4000 2500 39 64
Sera T5 daylight brillant
895 mm
6000 3900 45 87
Hagen / Fluval T5 Life Spectrum
850 mm
6700 3000 39 77
LED
LEDaquaristik eco+ LED bar
SKY 790mm
6500 2427* 25 97*
LEDaquaristik PRO² LED bar
SKY 755mm
6500 4125* 37 111*

Source: DATZ/Amazonas 66 and manufacturers' websites
*The data for the LEDaquaristik products are based on real measured values!

The power consumption value provided in the datasheet refers to a practical value for a ready-to-operate lighting system that contains only the essential components – in this case, an LED bar and a switching power supply.

In our technical specifications, we provide the gross value measured on the 230 V side, as this is relevant to the customer when it comes to the power consumption of the lighting.

For example: For an 80 cm eco+ LED bar combined with a 100W 12VDC switching power supply, the following was observed:

  • Directly at the 12V output of the switching power supply, the power consumption of the LED strip is 23 W (net power).
  • On the 230V side of the switching power supply, a power consumption of 28 W is measured (gross value). This results in a loss of about 5 W in the switching power supply, which consists of 0.6 W no-load losses (also known as iron losses) and 4.4 W load-dependent losses (also known as copper losses).

When several LED bars are combined in a lighting system and powered by a common switching power supply, the total gross power consumption of the system is typically slightly lower than the sum of the individual power values.

It is important to emphasize that these differences in power consumption have no impact on the light output (measured in lux, lumens, PAR, etc.). The light output data are always based on measurements at 100% power of the lighting unit.

Power Supply

What power output do I need? Please use our calculator to find out:

Power-supply-calculator

Model Length/Variant Quantity


Power supply Too much for one power supply


This is how it works: The power that the mains adapter has to supply is calculated by adding the individual power ratings (watts) of the intended LED lighting bars and then adding a further min. 10% reserve. The correct mains adapter is then the next larger model. Always allow for a minimum 10% power reserve in order not to overload the mains adapter! (Our calculator takes this into account automatically!)

For the avoidance of any misunderstandings: The mains adapters themselves do not consume 30, 75 or 150W of power! But they are capable of delivering this power! Power consumption depends only on the connected LEDs and the efficiency of the mains adapter! In standby (i.e. when the power supply unit is only plugged into the socket, not connected to LEDs or in operation) the consumption is close to zero.

The cable length for the eco+ and PRO² LED bars is 150cm. In order to extend the cables of the LED bars (150cm), which may be too short (to the installation site of the control unit), I recommend the extension cable by the metre with the solder connectors. 

For the aquaLUMix, powerBEAM and multiBEAM products, the cable length is 250cm and should not be extended.

A maximum cable length should always be kept as short as possible. There is a purely physical reason for this: the longer the cable, the higher the voltage drop, the less efficient the lighting. In addition, long cables behave like an antenna; the susceptibility to interference increases massively with the length of the cables. More than 3 m should therefore be avoided if possible.

The cable length of the power supply units is approx. 50cm on the input and output side.

While our LED lights have been on the market since 2013, there have also been occasional complaints. This can never be completely avoided, even with the greatest quality efforts.
Unusual, however, are those (only approx. 0.1% of all orders) in which LED strips already showed partial or complete failures after a relatively short operating time of only a few weeks and months. As a result, these defective LED strips were replaced by us, but unfortunately this only provided a short-term remedy and a similar error pattern was soon apparent. Here the assumption was obvious that overvoltage in the network of the customers was the reason for the failure of the LED lighting. We have therefore examined this topic more closely.

Observe overvoltage protection.

Even if you immediately think of a thunderstorm and lightning strike, overvoltage damage to the LED lighting usually has other, less conspicuous and insidious causes.
A lightning strike leads to a short-term overvoltage and to immediate failure and irrevocable defect of the lighting. Cause and effect are immediately and clearly recognisable. But there is also the long-term overvoltage. This initially goes unnoticed, but considerably impairs the service life of the LED lighting until visible damage and progressive failure occur after just a few weeks and months.
It is already sufficient if fluorescent tubes are operated in the same circuit with conventional ballasts (e.g. another older aquarium lighting) or electric motors (e.g. in vacuum cleaners, drills, etc.). This results in voltage peaks in the nano- or microsecond range, i.e. short-term increases in the mains voltage caused by switching operations in the electrical circuit or electrostatic discharges. For a short time, up to 10,000 volts are released into the line, only for fractions of a second, but this is sufficient to irreparably damage LED modules, electrical components or power supply units. Even power failures in the environment indirectly cause considerable overvoltages when the power is restored and all possible consumers suddenly resume operation at the same time.
How such an event affects the mains in your home and consequently the LED lighting depends on the type of installation and the protective circuits installed by the electrician. If you experience a massive failure of the LED lighting within a few weeks or months, it is in all probability not the quality of the LED lighting, but external influences. A mains filter with overvoltage protection should be installed on the affected supply line. Our LED lights can reach the value of a computer or television set, so you should protect them at least equally against overvoltage. Damage to the LED lighting caused by overvoltage is expressly not covered by the warranty. This is why we recommend the EMZ 504 broadband mains filter with overvoltage protection in the event of an unclean mains supply and/or overvoltage problems, or it can be seen preventively as a kind of "insurance".

No, because 12V is not really 12V. A stabilised DC mains adapter is necessary for LEDs. That means it must output a voltage of 12V DC. An ordinary 12V transformer for halogen bulbs is unsuitable here. The consequences of using one of these could be no light, flickering or even damage.

Light Control and Daylight simulation

Functions

SunRiser
2+

SunRiser
2XL

SunRiser
6

SunRiser
8

SimuLUX 24

Max. brightness 0-100% freely selectable

X

X

X

X

X

Dim phase duration freely selectable

X

X

X

X

X

Sunrise and sunset

X

X

X

X

X

Moonlight possible

X

X

X

X

X

Natural moon phases


X


Interruptions or changes to the
daily lighting routine (e.g. lunch break)


X

X

X

Weekdays individually programmable


X

X

Maintenance function (temporary full
output for working on the aquarium)

X

X

X

X


Static weather effects
(cloud cover, rainy day etc.)


X

X

X

Thunderstorm simulation, lightning


X


Automatic dynamic effects
(e.g. moving clouds, lightning, rainstorm)


X


Time lapse funtion (quick check)       X  

Individually programmable channels

2

2

6

8

5

Characteristics


Network-ready


X


Programming directly on the device

X

X

X


Programming using Windows PC


X

Programming and control through
a web interface, optimised for all
end devices, such as tablets, smartphones
or PCs (all operating systems)


X


Interface


LAN

USB-C

Automatic time update through the Internet


X


Regular software updates


X


Software languages

DE, EN

DE, EN

DE, EN, FR, NL, IT, PL, SE, DK, ES, CZ

DE

DE, EN

Operating instructions

DE, EN

DE, EN

DE, EN

DE, EN

DE, EN, IT, NL, FR

Settings and time automatically
saved if power interrupted

X

X

X

X

X

Open source software, customer
modifications/extensions possible


X


Output


Maximum total output LED 12V

120W (10A)

240W (20A)

240W (20A)

240W (20A)

240W (20A)

Maximum output per channel 12V

60W (5A)

120W (10A)

60W (5A)

60W (5A)

48W (4A)

Maximum total output LED 24V

240W (10A) 480W (20A) 480W (20A) 480W (20A) 480W (20A)
Maximum output per channel 24V 120W (5A) 240W (10A) 120W (5A) 120W (5A) 96W (4A)

Options


Temperature sensors


X


Separate WLAN adapter       X  
Power expandable through High-Power Solution     X X  

²Requires manual switching between programs| ³MAC/OSX possible with separate software

An automatic aquarium light control system or LED daylight simulation system offers great advantages for you and your fish!

Aquarium lights switching on and off suddenly is a source of recurring shock and stress to which your fish are exposed on a daily basis. The inhabitants of the aquarium would be much less nervous if they were gently brought out of their night-time rest. Moreover, a gradual, dimmed sunrise and sunset is not only closer to nature and visually very appealing, it also ensures that you are not suddenly plunged into darkness yourself at some point in the evening.

Our automatic light controls have between 2 and 8 singly and individually programmable channels, depending on the model. This allows each connected LED lamp to be controlled separately in terms of time and brightness. Therefore, in addition to simply modelling the sun rising and setting, you can add details such as stormy weather, clouds, moonshine and many other programs and simulations.

Another big advantage: During the LED daylight simulation, it is only very seldom that all your LED bars are operating simultaneously at full power, which has positive consequences for the electricity they consume. With only a slight throttling of the output (dimming), the power consumption drops almost in direct proportion without the light appearing noticeably less bright. A secondary effect is an extension of the service life of the LED lamp.

Yes, all our LED bars (eco+, PRO², and aquaLUMix) as well as the spotBEAM and powerBEAM pendant lights are dimmable.

Can I simulate daylight with your LED products?

Absolutely! We offer devices for automatic light control and daylight simulation. Our eco+ and PRO² LED bars have color combinations like SUNSET, DAY, and POLAR, which are ideal for daylight simulation. You can also add other light colors such as RED (dawn) and ROYAL BLUE (moonlight). The aquaLUMix already have a suitable light combination, and the same applies to powerBEAM & spotBEAM. Further details can be found in the product description.

Yes, this can be done without spending too much time or money.
Lighting units and mains adapters are connected to our controls without a plug. SunRiser control units have push-in screw terminals to which the lighting unit and network adapter cables can be directly attached. We offer suitable adapters so that you do not have to cut off your existing plugs.
Each channel of the SunRiser control system has a positive and negative terminal for connecting your lighting. If you wish to connect lighting with more than one light colour that currently has a common positive terminal, then your lighting units should be divided between the appropriate number of channels/colours/terminals. In addition, the maximum output (per channel and total) must be within the light control system's capacity, see product description or the Overview of light control systems.
In each case, the power is supplied by ONE mains adapter compatible with the lighting. Voltage 12 to 24V DC.
Please note: You cannot operate a mixture of 12V, 20V and/or 24V products! It has to be one of these only!

If you want to connect multicoloured lighting that has a common + pole, this must be divided among the corresponding number of channels/colours/poles. Here using the example of a SunRiser 4+. This set and other adapters for connection can be found here.

Connection of RGB lighting using the example of an Econlux SolarStinger Fresh 35.
This is an RGBW LED lighting, i.e. RGB LEDs (red, green, blue) and W for single-colour white LEDs. This model thus has a total of 4 separately controllable channels/light colours. As the power supply unit is permanently connected to the lamp, the cable must be cut and connected to the light control unit (SunRiser 4+ or 8). This is a 6-core cable, which in the case of the Econlux SolarStinger Fresh 35 is configured as follows:

  • Brown = Plus
  • White = Minus (white light)
  • Red = Minus (red light colour of the RGB)
  • Green = Minus (green light colour of the RGB)
  • Blue = Minus (blue light colour of the RGB)
  • Yellow = Minus (not used here, with other models possibly UV light)

Connecting a Juwel HeliaLux to the SunRiser 2+. The light colours white and blue can thus be dimmed and controlled separately.
This is a 3-core cable configured as follows:

Brown = Plus
Grey = Minus (white light)
Blue = Minus (blue light)

Connection of an EHEIM PowerLED+ to the SunRiser 8. Depending on the version of the lamp, all 2 or 3 light colours can be dimmed and controlled separately.
This is a 3-core cable configured as follows:

  • Blue = Plus
  • Grey = Minus (without function in this test model)
  • Brown = Minus (white light)
  • Black = Minus (white light)


OVERVIEW

Product

Voltage

Voltage compatible with
LEDaquaristik mains adapter 12V DC?*

Can be used with
LEDaquaristik light control/dimmer?*

Adapter available?

Aquatlantis Easy LED

24V

No

Yes

Yes

Daytime eco/Cluster

12V

Yes

Yes

Yes

Econlux SolarStinger SunStrip

24V

No

Yes

No**

EHEIM ClassicLED

24V

No

Yes

No**

EHEIM PowerLED

12V

Yes

Yes

Yes

EHEIM PowerLED+

24V

No

Yes

Yes

JUWEL HeliaLUX

20V

No

Yes

No**

SERA X-Change

20V

No

Yes

Yes

*An adapter may be required, see connection| **Plug can be removed to make a direct connection to the light control system. Terminals and cable colours see below.


Terminals and cable colours

JUWEL HeliaLUX (mains adapter)


Red

PLUS

Black

MINUS

JUWEL HeliaLUX (lamp)


Brown

PLUS common

Grey

MINUS channel 1

Blue

MINUS channel 2

Econlux SolarStinger SunStrip


Brown

PLUS common

White

MINUS white LEDs

Red

MINUS red LEDs

Green

MINUS green LEDs

Blue

MINUS blue LEDs

Yellow

MINUS blue/UV LEDs
if present

EHEIM Power Plus  
Blue PLUS
Brown MINUS CH1
Yellow MINUS CH2
Green MINUS CH3


A light control can only ever control the brightness of the LEDs. The light colour of the individual LED bar or the respective channel of the lamp is fixed. Depending on the mixing of the individual LED bars/channels by the control unit, a different overall colour results.

Example:

LED SUNSET 100% and LED POLAR 10% = a warm light

LED SUNSET 50% and LED POLAR 50% = a neutral light

LED SUNSET 10% and LED POLAR 100% = a cold light

Assistance with Issues and Defects

The following sections describe maintenance work that is required for optimal and trouble-free operation. Regular maintenance extends the service life and ensures the function of the products over a long period of time.

  • During maintenance and servicing, always disconnect the lighting from the mains. 
    If necessary, we recommend cleaning with a soft cloth and mild detergent.
  • Permanent moisture as well as limescale and dirt deposits can negatively affect the light quality, performance and service life of the LED bars.
  • For closed covers, we recommend using the CleanCover.
  • For light sources that cool passively via the ambient air, choose a well-ventilated location. Complete enclosure leads to a build-up of heat and impairs the service life. With closed aquarium covers, the existing openings for cables and hoses are usually sufficient for ventilation; observe the heat development and create additional openings if necessary.
  • Compared to fresh water, seawater is an extremely aggressive medium and only very few materials can withstand direct and permanent contact. In order not to shorten the life of the LED bars unnecessarily, appropriate precautions should be taken when using them in seawater. A glass cover on the aquarium is probably the best protection for the lighting. The water cooling system can only be used in marine environments with the TITAN extension!

In addition, the instructions in the operating manual must be observed.

A failure of this kind of a complete LED bar is very unlikely. Usually, such a failure is due to a faulty connection or cable extension. Therefore, please check the connection to the power supply/control unit to ensure that the terminals are correctly and firmly connected.

An improper cable extension/connection can lead to reduced performance, flickering or failure (loose contact).

You should have no or very little algae problems with LED lighting, because the light lacks a UV fraction.
In some rare cases, switching to a different type of light can lead to an unattractive build-up of algae. This can happen in particular if there is a great difference between the light, specifically with regard to quality. I could see this happening here.
If you have a dimmer, you could also temporarily reduce the brightness to ensure a more gradual move to LED light. 

Please understand that it is very difficult, if not impossible, to diagnose problems without being there on the spot.
• Water pollution? Phosphate? Nitrate?
• Perhaps the LED lighting is now stronger than the previous lighting system. 
• You are using (too much) fertiliser because the plants are not consuming as much of it under LED light as they did before
• The period of lighting has been changed 
• The light colour is much different to that used before 
  
If you are operating all the LED bars at full power at the same time, I would suggest initially switching 2 of them off (or even all 3) then increasing the quantity of light each week (as long as algae growth reduces). = darkness treatment.

The heat development of a power supply during continuous operation is normal and unavoidable. This is due to the thermal management, where the power supplies cool themselves through the casing, thereby generating heat. However, the power supplies are equipped with overheating protection. It's crucial that the power supply is properly sized to ensure optimal performance.

The temperature of a LED bar is directly related to its power. Thus, a slight warming of LED bars and the power supply is normal. However, it's crucial to ensure adequate air circulation to dissipate the generated heat. The existing openings in the cover are typically sufficient for this purpose.

If the SunRiser restarts sporadically, does not save settings, activates the LEDs unscheduled or does not load the web interface completely, there may be a defect (write/read error) on the SD card of the SunRiser.

In spite of several function tests by us before shipment, such an error of the MicroSD card can unfortunately not be avoided completely.


Solution 1

Often this problem can be solved with our factory tool. The internal SD card of the Suniser 8 is reformatted, the current firmware is installed and then your configuration is reloaded into the fresh system. If there are problems loading and restoring your configuration - please dispense with this point, repeat the process and select "no". After the restart, you can import your personal backup file in the usual way.

Let's go, open this link and follow the instructions/options.

http://sunriser.ledaquaristik.de/factory.html


Solution 2

If the above procedure is unsuccessful, you can alternatively open the SunRiser 8 and remove the MicroSD card.

See a photo at:http://srdemo.ledaquaristik.de/img/sdcard.jpg

Attention: Before you start, disconnect the power supply and disconnect all plugs of the LEDs.

Replacing the microSD card does not affect the guarantee or warranty, we consider this as regular use of the unit.

Now reformat the microSD card (FAT32, no quick formatting) and then save the firmware file "NEW.BEE" on the reformatted card. (You can also use another/new SD card of any size (from 2GB)).

Download the latest SunRiser 8 firmware ("NEW.BEE") at: http://sunriser.ledaquaristik.de/NEW.BEE.

Then insert the card back into the SunRiser 8 and close the unit. The firmware will be installed automatically when the unit is switched on and the SunRiser will restart. After the restart you can read in your personal backup file in the usual way.

If the SunRiser 6 (formerly 4+) does not turn off the light permanently, there is probably a bug in your program, an example:

  • 8:00=100%
  • 12:00=0%
  • 20:00=100%

Result: Only at exactly 12:00 is the lighting at 0%, just one second later the brightness increases again until 100% is reached at 20:00.

  • 8:00=100%
  • 12:00=0%
  • 16:00=0%
  • 20:00=100%

Result: From 12:00 to 16:00 the light is at 0%.

Check the programming again. You must also pay attention to the previous and next points.

Possible solutions:

Connect the SunRiser to the router. If necessary, do without repeaters or PowerLAN.
Call up the SunRiser Finderhttp://sunriser.ledaquaristik.de/


Also:

If you use a GBit switch, make sure that it also accepts 10/100Mbit devices.
DHCP should be enabled in your router
Check that the SunRiser is not blocked by the router's MAC address filter.
Eco or energy saving mode of the router: off
If necessary, disconnect other network devices as a test

The table helps to find the corresponding percentage value for a certain PWM value if required. PWM values are the values that can be set in the function test from 0-1000 of the SunRiser 4 and 8. The graph shows the dimming curve, which is not proportional due to the gamma correction. See FAQ.

Percent PWM LUX %
0% 0 0,000
1% 2 0,756
2% 2 0,756
3% 2 0,756
4% 2 0,756
5% 2 0,756
6% 2 0,756
7% 3 0,962
8% 3 0,962
9% 3 0,962
10% 3 0,962
11% 3 0,962
12% 4 1,100
13% 4 1,100
14% 4 1,100
15% 4 1,100
16% 5 1,237
17% 5 1,237
18% 5 1,237
19% 5 1,237
20% 6 1,375
21% 6 1,375
22% 7 1,512
23% 7 1,512
24% 7 1,512
25% 8 1,649
26% 8 1,649
27% 9 1,787
28% 9 1,787
29% 10 1,924
30% 11 2,062
31% 11 2,062
32% 12 2,131
33% 13 2,268
34% 14 2,337
35% 15 2,474
36% 16 2,543
37% 17 2,680
38% 18 2,818
39% 19 2,887
40% 20 3,024
41% 22 3,162
42% 23 3,299
43% 24 3,368
44% 26 3,574
45% 28 3,711
46% 30 3,918
47% 32 4,124
48% 34 4,330
49% 36 4,536
50% 38 4,674
51% 41 4,948
52% 44 5,223
53% 47 5,567
54% 50 5,911
55% 53 6,186
56% 56 6,460
57% 60 6,735
58% 64 7,079
59% 68 7,560
60% 73 7,904
61% 78 8,454
62% 83 9,003
63% 89 9,553
64% 95 10,103
65% 101 10,790
66% 108 11,409
67% 116 12,165
68% 124 12,852
69% 132 13,746
70% 141 14,639
71% 151 15,533
72% 161 16,564
73% 171 17,663
74% 183 18,832
75% 195 20,069
76% 208 21,306
77% 223 22,749
78% 239 24,261
79% 254 25,842
80% 270 27,491
81% 289 29,416
82% 308 31,340
83% 329 33,402
84% 353 35,601
85% 376 38,007
86% 400 40,481
87% 430 43,162
88% 460 46,048
89% 490 49,141
90% 520 52,440
91% 555 55,945
92% 593 59,656
93% 632 63,643
94% 677 67,904
95% 722 72,440
96% 769 77,251
97% 821 82,337
98% 877 87,904
99% 936 93,677
100% 1000 100,000

A well-known problem in many areas that have something to do with light, such as LED control or photography, is the subjective perception of brightness in relation to the actual power of the light. The problem here lies in the characteristic curve of the human eye. This is not linear, or more precisely: it is almost logarithmic. This makes it possible to perceive a very wide brightness range, from a full moon with ¼ lux to normal desk lighting with 750 lux to a bright summer day with up to 100,000 lux. Such highly dynamic signals can only be handled with a logarithmic characteristic curve.

To counteract this effect, there is the so-called gamma correction. Mathematically, this function is a power function with an exponent, often called gamma for short, as the only parameter. We have now added exactly this function to the daily planning. Pre-calculations, previously made with more powerful computers, increase the accuracy and relieve the comparatively small processor of the SunRiser.

In the function test, on the other hand, we work with the direct power value, i.e. the value 1 to 1000 stands for the actual power that the LED consumes, 500 would therefore mean that 50% of the maximum current power is applied. If you now specify 50% in the daily planning, this means that the planning tries to produce a 50% brightness, this is then approximately at the value 32 in the function test (one cannot say this exactly because the time factor also plays a role here and therefore the final value sometimes deviates in order to improve a smoother transition to the next stage).

In planning, however, for users who want to have full control over performance, is to create an option that turns off this gamma correction and thus does an absolute, linear performance fading over the set time period. A further step after that would be the possibility to adjust the gamma correction instead of just switching it off.

If you activate the moon, it will shine according to reality, this can also be during the day. This can of course be an undesirable effect. It is best to use a separate LED for the moon simulation. On http://www.mondverlauf.de/ you can check when the moon rises and sets, in one of the next versions you will be able to determine the GPS coordination for the calculation yourself.

Another helpful option that we will add soon is the setting of the period of the day where a moonrise can only happen.

Rain is handled in fronts in the same way as thunderstorms, i.e. a rain front is defined randomly in between, but since the rain tries to work off a certain % of rain per day, it is not (currently) possible for the user to influence this. Please note that the rain always occurs in combination with the thunderstorm, as long as a thunderstorm is set.

The entire web frontend uses an API to bring your configuration to the SunRiser. This API allows you to set the configuration, install firmware or any other functions you have in the web interface.

The communication for this runs as a MessagePack over HTTP from the SunRiser. We plan to add at least one more API via GET parameters to be integrated in systems like Fhem. On request we will also document the MessagePack API, but we plan to do this only for the GET API.

This will most likely be the rain or cloud simulation. Depending on how high the current value of the daily or weekly planning is, this can lead to very noticeable flickering, which some customers have already reported as a malfunction. When switching off the simulation, please note that the setting is available separately for each profile, so you must make sure to switch off the simulation in all profiles.

If the SunRiser restarts sporadically, does not save settings, activates the LEDs unscheduled or does not load the web interface completely, there may be a defect (write/read error) on the SD card of the SunRiser.

In spite of several function tests by us before shipment, such an error of the MicroSD card can unfortunately not be avoided completely.


Solution 1

Often this problem can be solved with our factory tool. The internal SD card of the Suniser 8 is reformatted, the current firmware is installed and then your configuration is reloaded into the fresh system. If there are problems loading and restoring your configuration - please dispense with this point, repeat the process and select "no". After the restart, you can import your personal backup file in the usual way.

Let's go, open this link and follow the instructions/options.

http://sunriser.ledaquaristik.de/factory.html


Solution 2

If the above procedure is unsuccessful, you can alternatively open the SunRiser 8 and remove the MicroSD card.

See a photo at:http://srdemo.ledaquaristik.de/img/sdcard.jpg

Attention: Before you start, disconnect the power supply and disconnect all plugs of the LEDs.

Replacing the microSD card does not affect the guarantee or warranty, we consider this as regular use of the unit.

Now reformat the microSD card (FAT32, no quick formatting) and then save the firmware file "NEW.BEE" on the reformatted card. (You can also use another/new SD card of any size (from 2GB)).

Download the latest SunRiser 8 firmware ("NEW.BEE") at: http://sunriser.ledaquaristik.de/NEW.BEE.

Then insert the card back into the SunRiser 8 and close the unit. The firmware will be installed automatically when the unit is switched on and the SunRiser will restart. After the restart you can read in your personal backup file in the usual way.

In the expert menu we have provided a function that allows you to copy back and forth between the programmes of the weekly planning or the daily planning. The markings in the programme or the daily planning are converted into comma-separated lists with the minutes of the day and the performance alternating. Simply copy from one field to another. You can also edit the values directly here, just make sure that the daily minute can be a maximum of 1439 and the power a maximum of 100.

No, the clouds and rain are not visible when the brightness setting is set to 0%, because they only work by lowering the brightness for a short time. Nevertheless, the SunRiser tries to maintain a certain minimum brightness.

The probability refers to the complete day, i.e. to see clouds (or rain) all day, you must set the probability to 100%. If the probability is set to e.g. 50%, the SunRiser will literally flip a coin every day and if it is heads there will be clouds. It is still possible that the amount of clouds or rain on these days may be very low to almost non-existent.

Possible solutions:

Connect the SunRiser to the router. If necessary, do without repeaters or PowerLAN.
Call up the SunRiser Finderhttp://sunriser.ledaquaristik.de/


Also:

If you use a GBit switch, make sure that it also accepts 10/100Mbit devices.
DHCP should be enabled in your router
Check that the SunRiser is not blocked by the router's MAC address filter.
Eco or energy saving mode of the router: off
If necessary, disconnect other network devices as a test

The rain simulation and the cloud simulation differ primarily in the commonality and in the duration of the brightness changes. A raindrop is a short darkening, while a cloud can darken over a longer period of time. Also, with clouds, all LEDs are connected together. If 3-4 LED bars are assigned to the cloud simulation, they all darken together. When it rains, on the other hand, all LED bars produce raindrops independently to support the image of a "chaotic" rain.

The higher the value, the more intensively clouds and rain darken the lighting. It is a relative value, i.e. it becomes less and less dark when the general brightness is low anyway.

SunRiser 4 / 6

Under the menu item "Info" you will find "To factory settings".

SunRiser 6, select by click and confirm again several times.... 

SunRiser 4+, select by DOUBLE CLICK and confirm again several times....

The table helps to find the corresponding percentage value for a certain PWM value if required. PWM values are the values that can be set in the function test from 0-1000 of the SunRiser 4 and 8. The graph shows the dimming curve, which is not proportional due to the gamma correction. See FAQ.

Percent PWM LUX %
0% 0 0,000
1% 2 0,756
2% 2 0,756
3% 2 0,756
4% 2 0,756
5% 2 0,756
6% 2 0,756
7% 3 0,962
8% 3 0,962
9% 3 0,962
10% 3 0,962
11% 3 0,962
12% 4 1,100
13% 4 1,100
14% 4 1,100
15% 4 1,100
16% 5 1,237
17% 5 1,237
18% 5 1,237
19% 5 1,237
20% 6 1,375
21% 6 1,375
22% 7 1,512
23% 7 1,512
24% 7 1,512
25% 8 1,649
26% 8 1,649
27% 9 1,787
28% 9 1,787
29% 10 1,924
30% 11 2,062
31% 11 2,062
32% 12 2,131
33% 13 2,268
34% 14 2,337
35% 15 2,474
36% 16 2,543
37% 17 2,680
38% 18 2,818
39% 19 2,887
40% 20 3,024
41% 22 3,162
42% 23 3,299
43% 24 3,368
44% 26 3,574
45% 28 3,711
46% 30 3,918
47% 32 4,124
48% 34 4,330
49% 36 4,536
50% 38 4,674
51% 41 4,948
52% 44 5,223
53% 47 5,567
54% 50 5,911
55% 53 6,186
56% 56 6,460
57% 60 6,735
58% 64 7,079
59% 68 7,560
60% 73 7,904
61% 78 8,454
62% 83 9,003
63% 89 9,553
64% 95 10,103
65% 101 10,790
66% 108 11,409
67% 116 12,165
68% 124 12,852
69% 132 13,746
70% 141 14,639
71% 151 15,533
72% 161 16,564
73% 171 17,663
74% 183 18,832
75% 195 20,069
76% 208 21,306
77% 223 22,749
78% 239 24,261
79% 254 25,842
80% 270 27,491
81% 289 29,416
82% 308 31,340
83% 329 33,402
84% 353 35,601
85% 376 38,007
86% 400 40,481
87% 430 43,162
88% 460 46,048
89% 490 49,141
90% 520 52,440
91% 555 55,945
92% 593 59,656
93% 632 63,643
94% 677 67,904
95% 722 72,440
96% 769 77,251
97% 821 82,337
98% 877 87,904
99% 936 93,677
100% 1000 100,000

If the SunRiser 6 (formerly 4+) does not turn off the light permanently, there is probably a bug in your program, an example:

  • 8:00=100%
  • 12:00=0%
  • 20:00=100%

Result: Only at exactly 12:00 is the lighting at 0%, just one second later the brightness increases again until 100% is reached at 20:00.

  • 8:00=100%
  • 12:00=0%
  • 16:00=0%
  • 20:00=100%

Result: From 12:00 to 16:00 the light is at 0%.

Check the programming again. You must also pay attention to the previous and next points.

New
SunRiser 6 dimming control and daylight simulation

Bring your aquarium to life! Discover gentle sunrises and sunsets, individualized scenarios, and energy-efficient control in one device.

Product number: 156-00

€149.99*
%
SunRiser 2 XL dimming control and daylight simulation

Experience harmonious sunrises and sunsets in your aquarium. Intuitive, powerful, and designed for breathtaking moments of light.

Product number: 153-XL

€79.99* €89.99* (11.11% saved)
DIMIX6 - manual 6-channel LED dimmer and mixer

Discover the ultimate control over your LEDs: Manual dimming and mixing made easy.

Product number: 146-00

€59.99*
LED dimmer (manual 1-channel stepless)

For manual dimming of the brightness of the LED strip(s) via remote control

Product number: 140-RC
Version

Variants from €25.99*
€29.99*
LED dimmer (manual 1-channel stepless)

For manual dimming of the brightness of the LED strip(s) via a rotary knob.

Product number: 140-DK
Version

€25.99*